
# PanelAlpha Engine
This documentation covers PanelAlpha Engine version 2.0+. This version of Engine is not yet supported by the PanelAlpha Single Server and Multi Server control panels. They still use PanelAlpha Engine v1.x, and you can find its documentation here.
# What is PanelAlpha Engine?
PanelAlpha Engine is software you install on your VPS to host AI-built and vibe-coded projects, websites and open-source apps you found online.
Once installed, you can connect your own AI agent directly to PanelAlpha Engine and let it handle deployments, maintenance and server management for you. Your server stays organized and under control.
But most importantly, it makes managing your own server/VPS super simple. You don't have to be a sysadmin to self-host anymore!
Out of the box, PanelAlpha Engine gives you and your AI everything you need to run real projects in production:
- Deploy any stack from Git or files
- Instant preview URLs with optional password protection
- Staging and Git workflows with separate live and staging environments
- Automatic backups and restore
- External monitoring and built-in visitor statistics
- Project isolation with separate Docker containers
- Firewall and OWASP/WAF protection with per-project access rules
- Domains, SSL, cron, FTP/SFTP, databases, logs
- Easy Cloudflare integration for DNS, Tunnels and caching
All it takes is just three simple steps to set it up.

# Getting started
# 1. Install on your VPS
You need a fresh VPS and root access over SSH. Full requirements and options are on the Install page.
One-line app installation command is the fastest way to get started, as it installs the engine and puts an application online in one go. You simply add whatever Git repo you want to use after --repo and the installer takes care of both parts: it installs the engine and immediately starts setting up the project from the repository you provided. For example, if you want to install the engine and deploy n8n at the same time, this is all you need:
curl -fsSL https://get.panelalpha.com/engine | sh -s -- --repo https://github.com/n8n-io/n8n
When it finishes, it prints the address of your new site and, unless you pass --no-password, the password that opens it. Private repositories, a password of your own, and running it on a server that already has the engine: One-line app installation command.
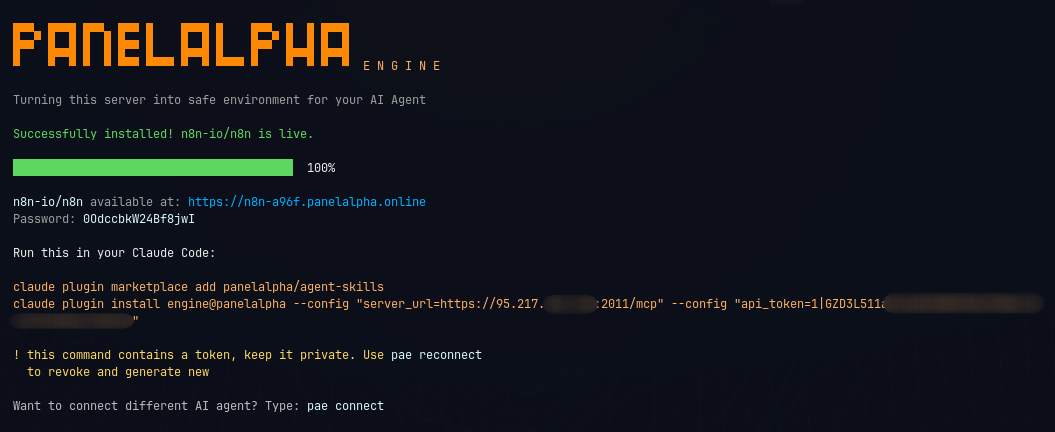
Prefer to do the two steps separately? Use the command below to install only the engine, and deploy your application later from your assistant (see step 3):
curl -fsSL https://get.panelalpha.com/engine | sh
A few minutes later the engine is running and prints its addresses and a command to connect your assistant. Want a custom name, your own TLS, or a VPS behind NAT? Read Install first.
# 2. Connect your AI assistant
Connecting happens on your own computer, not on your VPS. After install you get a screen like this, with a ready-made command for Claude Code. Copy that command and run it on your computer.
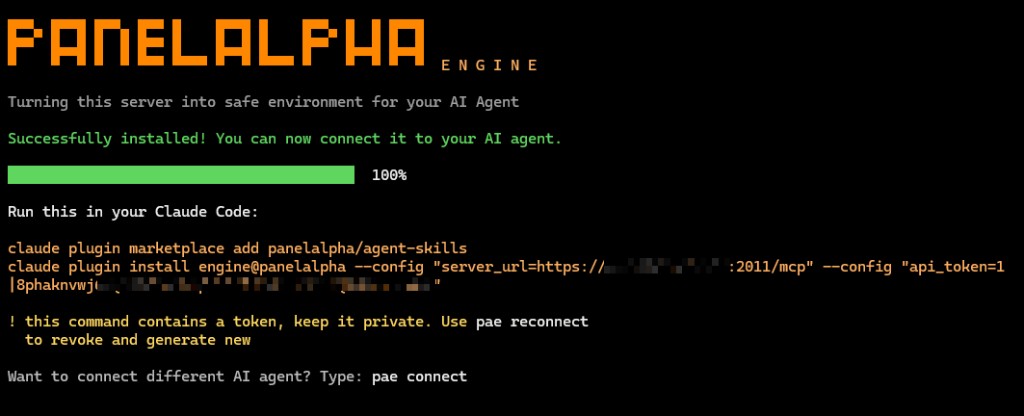
If you use a different assistant, run this on your VPS. It prints the exact line to run on your computer, with your address and a token already filled in:
pae connect
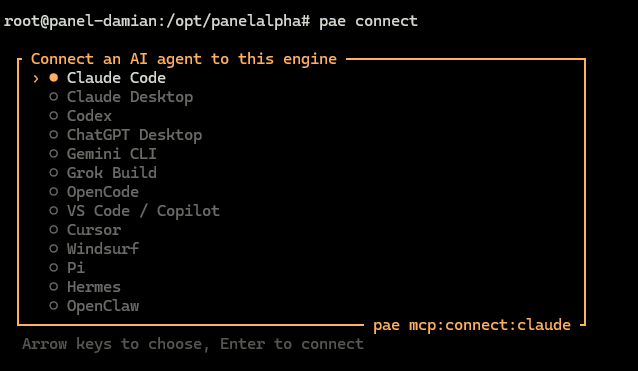
Run
pae connecton your VPS, not on your own computer.
Each assistant has a setup page with how to check it worked and what usually goes wrong: Connecting your AI.
Before you connect, decide what the assistant may do. By default it can permanently delete an entire project. pae configure on the VPS walks through that, and through the address, the queue, and telemetry: Configure the engine. The settings it writes are listed under Decide what the assistant may do.
# 3. Put your project online
Open your assistant's chat and describe what you want. A project is one application or website on this VPS. Each one gets its own isolated space, files, address and database.
A new WordPress project
Set up WordPress on a new project on this PanelAlpha Engine.An application from a public git repository
Deploy my application https://github.com/org/app on this PanelAlpha Engine.A private repository. Tell the assistant it is private. Do not put the access token in the chat. The assistant sends a page where you paste a git token: Connecting with Git.
Deploy https://github.com/org/private-app on this PanelAlpha Engine.
The repository is private.
A zip of files, not a repository
Upload this archive into the project and deploy it: /path/to/app.zip
You should get a web address back. Open the address it gives you. If the deploy failed, or came back "partial": When a deploy fails. What happens during a deploy, in order: How a deploy works.
# How to use it
The main way to run PanelAlpha Engine is to connect an AI assistant and describe what you want in chat. You can also run commands on the VPS, or call the same operations from your own software.
- Connecting your AI: Connect an assistant after install and drive deployments, maintenance and server management from chat.
- CLI commands:
paeon your VPS over SSH, and the REST API for software you build on top of the engine. - Getting Started: Install, configure the engine, update, uninstall, how a deploy works, looking after a project, telemetry, and failed deploys.
- Supported projects: Stacks the engine can run, what your repository needs, and how detection works.
- Capabilities: Git, projects, backups, domains, databases, files, WordPress, monitoring, visitor statistics, security and Cloudflare.