
# Install
This is the one-time setup. Check your VPS against the list below, log in as root over SSH, run one command, and wait for it to print your engine's addresses and a command to connect your assistant.
Expect it to take several minutes. It asks you nothing along the way.
When it is done, the software lives in /opt/panelalpha/shared-hosting, the pae command is available from anywhere, and nginx-proxy is running as the public webserver that serves your sites. That is the only supported webserver.
# Before you start
You need a VPS that meets all five:
| Requirement | What you need |
|---|---|
| Operating system | Debian 12 or 13, or Ubuntu 22.04, 24.04 or 26.04 |
| Access | Logged in as root over SSH, not sudo |
| The VPS | Brand new, with nothing else running on it |
| Memory | 2 GB of RAM, more as you add projects |
| Network | A public IPv4 address |
The installer checks the operating system and refuses anything else. It does not check the rest, so check them yourself.
Why the VPS has to be brand new. The installer takes the machine over: it installs Docker, a firewall and a watchdog, and it takes over how the machine looks up domain names. That is fine on an empty VPS and destructive on one already doing a job. Do not use your laptop, a VPS already running a website or control panel, or anything you would mind reinstalling.
No public IPv4 address? The engine still works, but the install command is different. Read Troubleshooting before you install.
# 1. Run the installer
curl -fsSL https://get.panelalpha.com/engine | sh
A few minutes later the engine is running. It prints its addresses and a command to connect your assistant. Want a name of your own, or a VPS the internet cannot reach by IP? Read Troubleshooting before you install.
# One-line app installation command
You can install the engine and put an application from a git repository online in one command. Use the web address of the repository, the one you would open in a browser. The installer finishes setting up the engine, then creates a new project from that repository. It picks the project name and the site's address for you.
Pass flags after sh -s -- so they reach the installer:
curl -fsSL https://get.panelalpha.com/engine | sh -s -- \
  --repo https://github.com/n8n-io/n8n
When it finishes, it prints the web address of your new site (it starts with https://). Unless you passed --no-password, it also prints the password that opens the site: the one you gave with --password, or one the installer made up. Copy it from the screen. If the installer could not set the password, it says so and prints the command to try again. Below that comes the same information for connecting your AI assistant as after a normal install. Continue with Connect your AI assistant on your own computer.
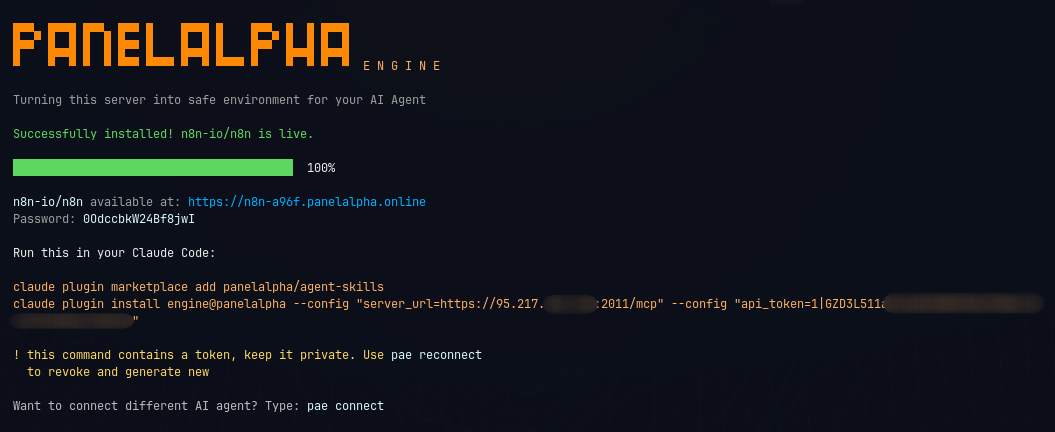
--repo is the application you want hosted. It is not where the engine software comes from. You do not pass a licence key.
| Flag | What it does |
|---|---|
--repo URL | Git repository to deploy. Its https:// address, or just owner/repo for a repository on GitHub. Addresses that start with git@ do not work. |
--branch REF | Branch, tag, or commit to deploy. Omit to use the repository default. |
--git-token TOKEN | Access token that lets the installer read a private repository. Without it, a private or missing repository is refused before the install starts. |
--password PASS | Site password for the new project. |
--no-password | Do not set a site password on the project. |
If the deploy fails, the engine is still installed and usable. The installer prints what went wrong. Deploy again from the VPS:
pae project:create --repo https://github.com/org/app
Or connect an assistant and ask in chat: Put your project online.
The engine is already on this VPS. Run the same curl line with --repo again. If a newer engine build is available, the installer asks whether to update the engine and deploy, or only deploy the project. Without an interactive terminal it deploys the project only. Pass --update-engine to update and deploy without being asked, or --deploy-only to deploy without updating.
# 2. Connect your AI assistant
Connecting happens on your own computer, not on your VPS. After install you get a screen like this, with a ready-made command for Claude Code. Copy that command and run it on your computer.
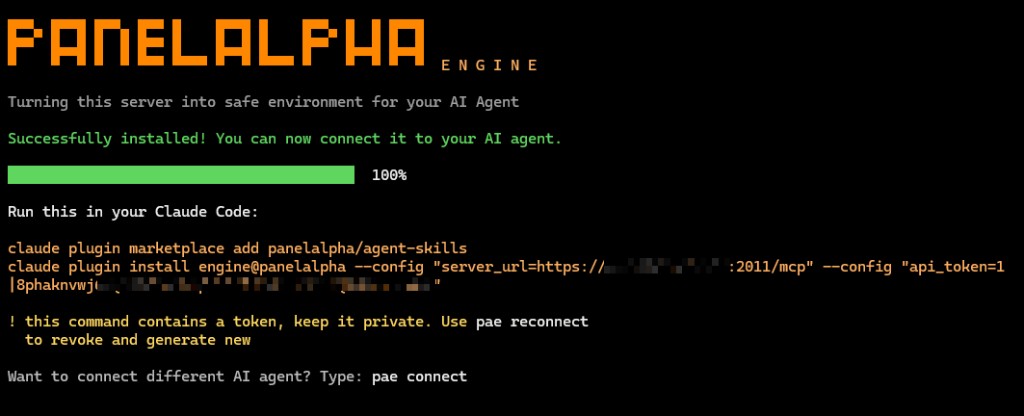
If you use a different assistant, run this on your VPS. It prints the exact line to run on your computer, with your address and a token already filled in:
pae connect
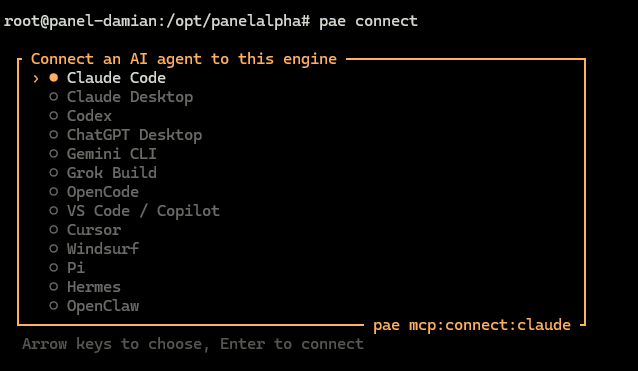
Run
pae connecton your VPS, not on your own computer.
Each assistant has a setup page with how to check it worked and what usually goes wrong: Connecting your AI.
Before you connect, decide what the assistant may do. By default it can permanently delete an entire project: Decide what the assistant may do.
If your assistant refuses to connect and mentions a certificate, see If connecting asks you to trust a certificate.
# What happens afterwards
The installer keeps downloading commonly-used software in the background so your first deploy is fast. You can start using the engine straight away.
Telemetry is on: anonymous reports about deploys and later health checks leave your VPS unless you turn it off. Those reports include the public names of your sites. What is collected · How to turn it off.
# Change a setting
Most VPS installs never need this. Come here to change the address your assistant connects to, or when another page tells you to edit a line in the settings file.
All settings live in /opt/panelalpha/shared-hosting/.env-core. There is a second file next to it called .env. That one holds internal passwords. Do not edit it unless PanelAlpha support asks you to.
Editing the file does nothing on its own. The engine reads its settings when it starts, so your change sits there doing nothing until you tell it to reload.
1. Open the file.
nano /opt/panelalpha/shared-hosting/.env-core
Find the line with the setting name on it and change the value after the =. If there is no such line, add it at the end. Save with Ctrl+O, then close with Ctrl+X.
2. Tell the engine to reload.
docker compose -f /opt/panelalpha/shared-hosting/docker-compose.yml exec core php artisan queue:restart
Copy that line exactly. The API picks up the change on its next request. Background workers pick it up once the job they are running finishes, so a deploy already in progress is not interrupted. The websites you host are not affected.
3. Check it worked. For telemetry, pae telemetry:status. For what the assistant is allowed to do, pae mcp:tool:list. If it still shows the old value, the restart did not take. Run step 2 again.
APP_URL is the address your AI assistant uses to reach the engine, including the port, for example APP_URL=https://panel.example.com:2011. The installer sets this for you and keeps it up to date whenever the engine gets a certificate for a new name. You only need to touch it if you are changing that address yourself. The new address has to be one your certificate covers and one your computer can reach.
What the assistant is allowed to do lives in the same file: Decide what the assistant may do. To stop telemetry, the usual command does not need this file: How to turn telemetry off.
# Outgoing email
Your engine can send email. Ask your assistant:
Show me this engine's outgoing email settings, then send a test message to [email protected].
To send through a provider, tell the assistant which one and give it your details. Avoid pasting live passwords or keys into a chat you might share later.
# Next
Need another token later, or one for a second computer? Create a token.
# If connecting asks you to trust a certificate
Most installs do not need this. You copy the command, run it on your computer, and the assistant connects.
Sometimes the assistant refuses and talks about a certificate. That means the engine is using a temporary certificate your computer does not know yet. It is normal on a VPS with no public address. The engine still runs.
Tell your computer to trust the engine: Trust a self-signed certificate. Or give the engine a name on the internet and request a trusted certificate, in Troubleshooting.
On a VPS with a public IPv4 address, the engine gets a trusted certificate by itself. For the IP address it lasts about six days and renews on its own. For a name of your own it lasts longer, also renewed automatically.
# Troubleshooting
I already have a domain pointed at the VPS. Install with it and you skip the self-signed step entirely. Set the DNS record up before you install, or the certificate request will fail.
curl -fsSL https://get.panelalpha.com/engine | sh -s -- --domain panel.example.com
My VPS has no public IPv4 address.
This covers offices, home connections, some cloud providers, and a VPS with only an IPv6 address. Point a name at the VPS, then tell the installer that the address on its network card is not how the world reaches it. The --domain part is what gets you a real certificate.
curl -fsSL https://get.panelalpha.com/engine | sh -s -- --domain panel.example.com --no-local-ip --enable-nat
I want a real certificate on an engine that is already self-signed. Point a name of your own at the VPS at your DNS provider, wait until it resolves, then run:
pae ssl:engine-cert:request --domain panel.example.com
I was told to use another installer option. The installer has a handful more, for testing and for support to point you at. Some of them switch off the protections that keep projects separated from each other, so use one only when support gives you the exact line to run.
I used --repo and the deploy failed.
The engine itself is up. Read the message at the end of the install, or run pae project:create --repo … again with the same URL. For a private repository, include --git-token. If the deploy finished but the application does not look right, ask your assistant to read the deploy log, or see Reading errors.
The installer warned that project disk limits will not be enforced.
The installer turns on disk quota for the disk that holds /home, so a project's disk and file-count limits actually stop it writing. It adds a quota option to that disk's line in /etc/fstab, and keeps a copy of the old file next to it. It only does this itself on ext4. On XFS the warning tells you the one setting to add and asks for a restart. On anything else, or inside a container, limits are recorded but not enforced. To leave quota off on purpose, install with --no-quota.
I want a different webserver. Not supported. Sites are served through nginx-proxy only.
The installer refuses my operating system. It is not one of the five listed in Before you start. Use a supported version.
I got a self-signed certificate but expected a real one. Either the VPS has no public IPv4 address, or the name you gave was not yet pointing at the VPS when the installer checked. Fix the DNS record, wait for it to take effect, then request the certificate as above.
The installer complains that port 53 is in use. Something else on the VPS is already handling web-address lookups. This is a sign the VPS was not empty. Use a fresh one.
The install failed partway through. Do not run it again on top. Remove the engine, restart the VPS, then install again.
The installer did not print a Claude Code command. The token step did not finish. Create one yourself:
pae connect claude
pae: command not found after a successful install.
The command registration step did not finish. Run it yourself:
bash /opt/panelalpha/shared-hosting/scripts/pae-command.sh register
I changed a setting and nothing happened. You have not restarted the engine. Do all three steps in Change a setting.
It still shows the old value after restarting.
Restart once more and check again. If it is still wrong, you edited the wrong file. Make sure it was .env-core, not .env.
I changed APP_URL and my assistant stopped connecting.
The new address has to be one your certificate covers and one your computer can reach. Put the old value back, then sort the certificate out first: Domains and HTTPS.